@Micky This is great, thanks for sharing. I would like to add this online course for python beginners that has some problems to solve and lets you practice writing python in the browser, without all the hassle of opening a terminal!
https://codingbat.com/python
Best posts made by darren
-
RE: Automate the Borning Stuff with Python (2nd Edition) - Practical Programming for Total Beginnersposted in Learning to Code
-
Docker: Part 3 - How we use Docker at the OPFposted in Packaging Standards & Containerisation
How we use Docker at the OPF
What we have seen so far
We have covered a lot of ground so far and have a good understanding of containers and images.
We have seen a little bit about ports and networking and a little bit of volumes. These are important concepts, so it is probably worth exploring these a bit further.
We also looked at how to take a base image 'off the shelf' and adapt it for our own use. This was achieved in a very manual way, so we can look at how to do this procedurally in a reproducible way.Where can we go next
Applications in Production environments often need multiple containers to work together, for instance most interactive websites require a database at the very least and may have other dependencies too.
Up until this point we have been either using the command line or the desktop GUI tool to launch and manage our containers, this is great for testing and doing very specific Docker tasks, but can become cumbersome for server deployments with many Applications, where each application is composed of multiple containers.
Ideally we would like to be able to manage a lot of containers in a structured way, that is reproducible and perhaps we can manage via git (and by extension store in GitHub). Today we are going to try to get there.Networking
I kind of glossed over this Docker fundamental concept so far (but if you are into networking and want a deep dive, the official docs are very informative). If we just have the host PC and a single test container then there is very little to speak about other than opening a port into the container so that the host PC can interact with the application. Our example used a web server - so interaction was as simple as loading a browser. Some applications like databases or APIs might require more complex testing tools, and some containers are designed to have no networking and you interact with via the command line. When you start a container and open a port Docker will create a subnet for that container, give it its own IP address and the container will be isolated from other containers and the outside world via NAT and DNS. If you are unfamiliar with these concepts I don't want to go down those rabbit holes in this discussion. But these are the same tools your home router uses to let your PC communicate across the internet, but stops other customers from your ISP or the wider world sending documents to your printer or connecting to your smart speakers. Docker will create lots of virtual and separate networks for the containers you deploy. Docker will also automatically destroy these networks when they are no longer needed, unless you specify them.
Going back to our example application with a web-application and database. It will be necessary for these two containers to be in the same network. We can create a bridge network give it a name, then we can start both our containers and add them to the network. At this point they can use their respective hostnames (we didn't cover this yet, but you can specify a container's hostname with a--hostnameflag) to communicate within the network (using DNS services) and communicate with the outside world via NAT provided by the Docker engine.
There is more to read up on this subject like network drivers and other advanced setups, but for our needs we have enough, but I would like to address ports in a bit more depth.Ports
Just a quick recap on ports with our new knowledge.
Exposing ports from a container to the host is done with the-pflag like so-p 80:80This is a port mapping with the Host port on the left and the container's port inside the network on the right:
-p HOST:CONTAINERThis ability to map ports is powerful because it means containers can have the same ports in use inside their own networks, like this port 80 above is the standard HTTP web port, so I might have a lot of web servers all using port 80 inside containers - but i can expose them all to my host via a range of ports I have on my host machine (say 80, 81, 82, 83, 84, and 85).
This is useful for testing, but in production we should try to map as few ports as possible for security reasons. The port to my database container does not need to be mapped for my web-application to communicate with the database inside the bridged network for instance.Volumes
Volumes have a similar flag construct to ports:
-v ./files/:/opt/app/files/

-v HOST_PATH:CONTAINER_PATH
This lets you inject folders or single files into the containers file system overwriting the files provided by the source Image. They also allow you to persist files in the Host that would otherwise be lost when the Container is recycled. Again there is more to Storage in Docker than just volumes, and I encourage you to explore the official documentation if you are interested.
Bringing it all together
Once you get the docker bug it wont be long before you find yourself with 20 or so containers all running at once and it can get a bit overwhelming.
While it is not impossible to manage a lot of containers with just the command line, I personally prefer to use some ease of life tools to help. The first two are text files that help us organise our Images and Containers. They are the Dockerfile and docker-compose.yml files. With these files we can manage our servers, and use git to help us. This is a concept know as Infrastructure as a service. We can manage our servers like a git project, and quickly redeploy applications or migrate them in a controllable repeatable way.Dockerfile
In part two we saw how to take a base Image and tweak it to our needs by pulling the image from DockerHub and then making changes and tweaks to it, and then create a new image from that. These Images can then be pushed back to DockerHub if you have an account.
A Dockerfile is a text file with a set of instructions that enable the creation of an Image in an automated fashion. The commands in the Dockerfile are the same as you would use on the command line. Plus you can use the RUN command to execute shell commands inside the new Image.docker-compose.yml
When we start to have a lot of containers especially when there are interdependencies - like a web server needing a database container, using the command line to orchestrate all of these containers their networking and volumes can be cumbersome. So one way to address this is with a 'compose file' - this is a text file that uses a human readable structure to define our application stack and we can pass it to docker to start and stop the entire application stack at once. It provides a clear and concise way to specify the services, networks, volumes, and other settings required for running interconnected containers as a cohesive application stack. Within the docker-compose.yml file, you can define various services and their corresponding images, along with their dependencies, environment variables, exposed ports, and more. By using this file, developers can easily orchestrate the deployment and scaling of complex applications with a single command, simplifying the process of managing and maintaining multi-container environments. This information being in a text file means we can check it into git so we get all the benefits of change control over infrastructure deployment too.
Part 4
In the next part I will show some real world examples of these deployments.
-
Docker and Docker Composeposted in Interesting Reads?
Docker Tricks and Tips
- How to organise your projects.
- How to get free SSL certificates.
- How to implement secrets.
Series starts here:
https://community.openpreservation.org/topic/14/introduction-to-docker
Latest posts made by darren
-
Docker: Part 3 - How we use Docker at the OPFposted in Packaging Standards & Containerisation
How we use Docker at the OPF
What we have seen so far
We have covered a lot of ground so far and have a good understanding of containers and images.
We have seen a little bit about ports and networking and a little bit of volumes. These are important concepts, so it is probably worth exploring these a bit further.
We also looked at how to take a base image 'off the shelf' and adapt it for our own use. This was achieved in a very manual way, so we can look at how to do this procedurally in a reproducible way.Where can we go next
Applications in Production environments often need multiple containers to work together, for instance most interactive websites require a database at the very least and may have other dependencies too.
Up until this point we have been either using the command line or the desktop GUI tool to launch and manage our containers, this is great for testing and doing very specific Docker tasks, but can become cumbersome for server deployments with many Applications, where each application is composed of multiple containers.
Ideally we would like to be able to manage a lot of containers in a structured way, that is reproducible and perhaps we can manage via git (and by extension store in GitHub). Today we are going to try to get there.Networking
I kind of glossed over this Docker fundamental concept so far (but if you are into networking and want a deep dive, the official docs are very informative). If we just have the host PC and a single test container then there is very little to speak about other than opening a port into the container so that the host PC can interact with the application. Our example used a web server - so interaction was as simple as loading a browser. Some applications like databases or APIs might require more complex testing tools, and some containers are designed to have no networking and you interact with via the command line. When you start a container and open a port Docker will create a subnet for that container, give it its own IP address and the container will be isolated from other containers and the outside world via NAT and DNS. If you are unfamiliar with these concepts I don't want to go down those rabbit holes in this discussion. But these are the same tools your home router uses to let your PC communicate across the internet, but stops other customers from your ISP or the wider world sending documents to your printer or connecting to your smart speakers. Docker will create lots of virtual and separate networks for the containers you deploy. Docker will also automatically destroy these networks when they are no longer needed, unless you specify them.
Going back to our example application with a web-application and database. It will be necessary for these two containers to be in the same network. We can create a bridge network give it a name, then we can start both our containers and add them to the network. At this point they can use their respective hostnames (we didn't cover this yet, but you can specify a container's hostname with a--hostnameflag) to communicate within the network (using DNS services) and communicate with the outside world via NAT provided by the Docker engine.
There is more to read up on this subject like network drivers and other advanced setups, but for our needs we have enough, but I would like to address ports in a bit more depth.Ports
Just a quick recap on ports with our new knowledge.
Exposing ports from a container to the host is done with the-pflag like so-p 80:80This is a port mapping with the Host port on the left and the container's port inside the network on the right:
-p HOST:CONTAINERThis ability to map ports is powerful because it means containers can have the same ports in use inside their own networks, like this port 80 above is the standard HTTP web port, so I might have a lot of web servers all using port 80 inside containers - but i can expose them all to my host via a range of ports I have on my host machine (say 80, 81, 82, 83, 84, and 85).
This is useful for testing, but in production we should try to map as few ports as possible for security reasons. The port to my database container does not need to be mapped for my web-application to communicate with the database inside the bridged network for instance.Volumes
Volumes have a similar flag construct to ports:
-v ./files/:/opt/app/files/

-v HOST_PATH:CONTAINER_PATH
This lets you inject folders or single files into the containers file system overwriting the files provided by the source Image. They also allow you to persist files in the Host that would otherwise be lost when the Container is recycled. Again there is more to Storage in Docker than just volumes, and I encourage you to explore the official documentation if you are interested.
Bringing it all together
Once you get the docker bug it wont be long before you find yourself with 20 or so containers all running at once and it can get a bit overwhelming.
While it is not impossible to manage a lot of containers with just the command line, I personally prefer to use some ease of life tools to help. The first two are text files that help us organise our Images and Containers. They are the Dockerfile and docker-compose.yml files. With these files we can manage our servers, and use git to help us. This is a concept know as Infrastructure as a service. We can manage our servers like a git project, and quickly redeploy applications or migrate them in a controllable repeatable way.Dockerfile
In part two we saw how to take a base Image and tweak it to our needs by pulling the image from DockerHub and then making changes and tweaks to it, and then create a new image from that. These Images can then be pushed back to DockerHub if you have an account.
A Dockerfile is a text file with a set of instructions that enable the creation of an Image in an automated fashion. The commands in the Dockerfile are the same as you would use on the command line. Plus you can use the RUN command to execute shell commands inside the new Image.docker-compose.yml
When we start to have a lot of containers especially when there are interdependencies - like a web server needing a database container, using the command line to orchestrate all of these containers their networking and volumes can be cumbersome. So one way to address this is with a 'compose file' - this is a text file that uses a human readable structure to define our application stack and we can pass it to docker to start and stop the entire application stack at once. It provides a clear and concise way to specify the services, networks, volumes, and other settings required for running interconnected containers as a cohesive application stack. Within the docker-compose.yml file, you can define various services and their corresponding images, along with their dependencies, environment variables, exposed ports, and more. By using this file, developers can easily orchestrate the deployment and scaling of complex applications with a single command, simplifying the process of managing and maintaining multi-container environments. This information being in a text file means we can check it into git so we get all the benefits of change control over infrastructure deployment too.
Part 4
In the next part I will show some real world examples of these deployments.
-
Docker: Part 2posted in Packaging Standards & Containerisation
Digging deeper into Docker
In the previous instalment we got to grips with some basic Docker concepts, so today I would like to build on what we know. We will look at what can you do with Docker, and how we can create something more interesting than a hello-world application.
Containers are ephemeral
This is a concept you will encounter in the world of containerisation. That the containers are disposable, none of the data inside the container persists when the container stops. This is by design. You may have heard of the phrase 'micro service'? Containers should do a specific task, and if you need to do a lot of that task, you can "scale" a service by creating more containers. With this mindset, containers should be easy to create and delete on demand when they are needed. Websites and web-services built with this mindset can grow and shrink to meet demand. Which can be good for the bank balance - but also for the environment!
Packaged application
One typical use for this is a self contained packaged application. And here at the OPF we have demonstrator packages for our web based tools that are packaged as docker images. These require no persistent storage and are therefore fully self contained. They can be spun up and down as needed.
One example is veraPDF. This is a command line application but there is a Desktop GUI version and Web GUI version too. In the past installing Java applications has been a bit tricky because you needed a compatible Java already installed and admin permissions perhaps (Recent veraPDF installers have made this task easier). However if you have Docker available to you then all of these dependency issues and Java versions problems all vanish. Getting veraPDF up and running is easy, getting a web demonstrator running in the browser is just a few keystrokes away:docker run -d -p 8123:8080 --name veraPDF darrenopf/verapdf-restAfter the image is pulled from docker hub and begins running, you can access the web GUI on your browser by going to the localhost address. You can also use the Docker Desktop tool to get the same result.
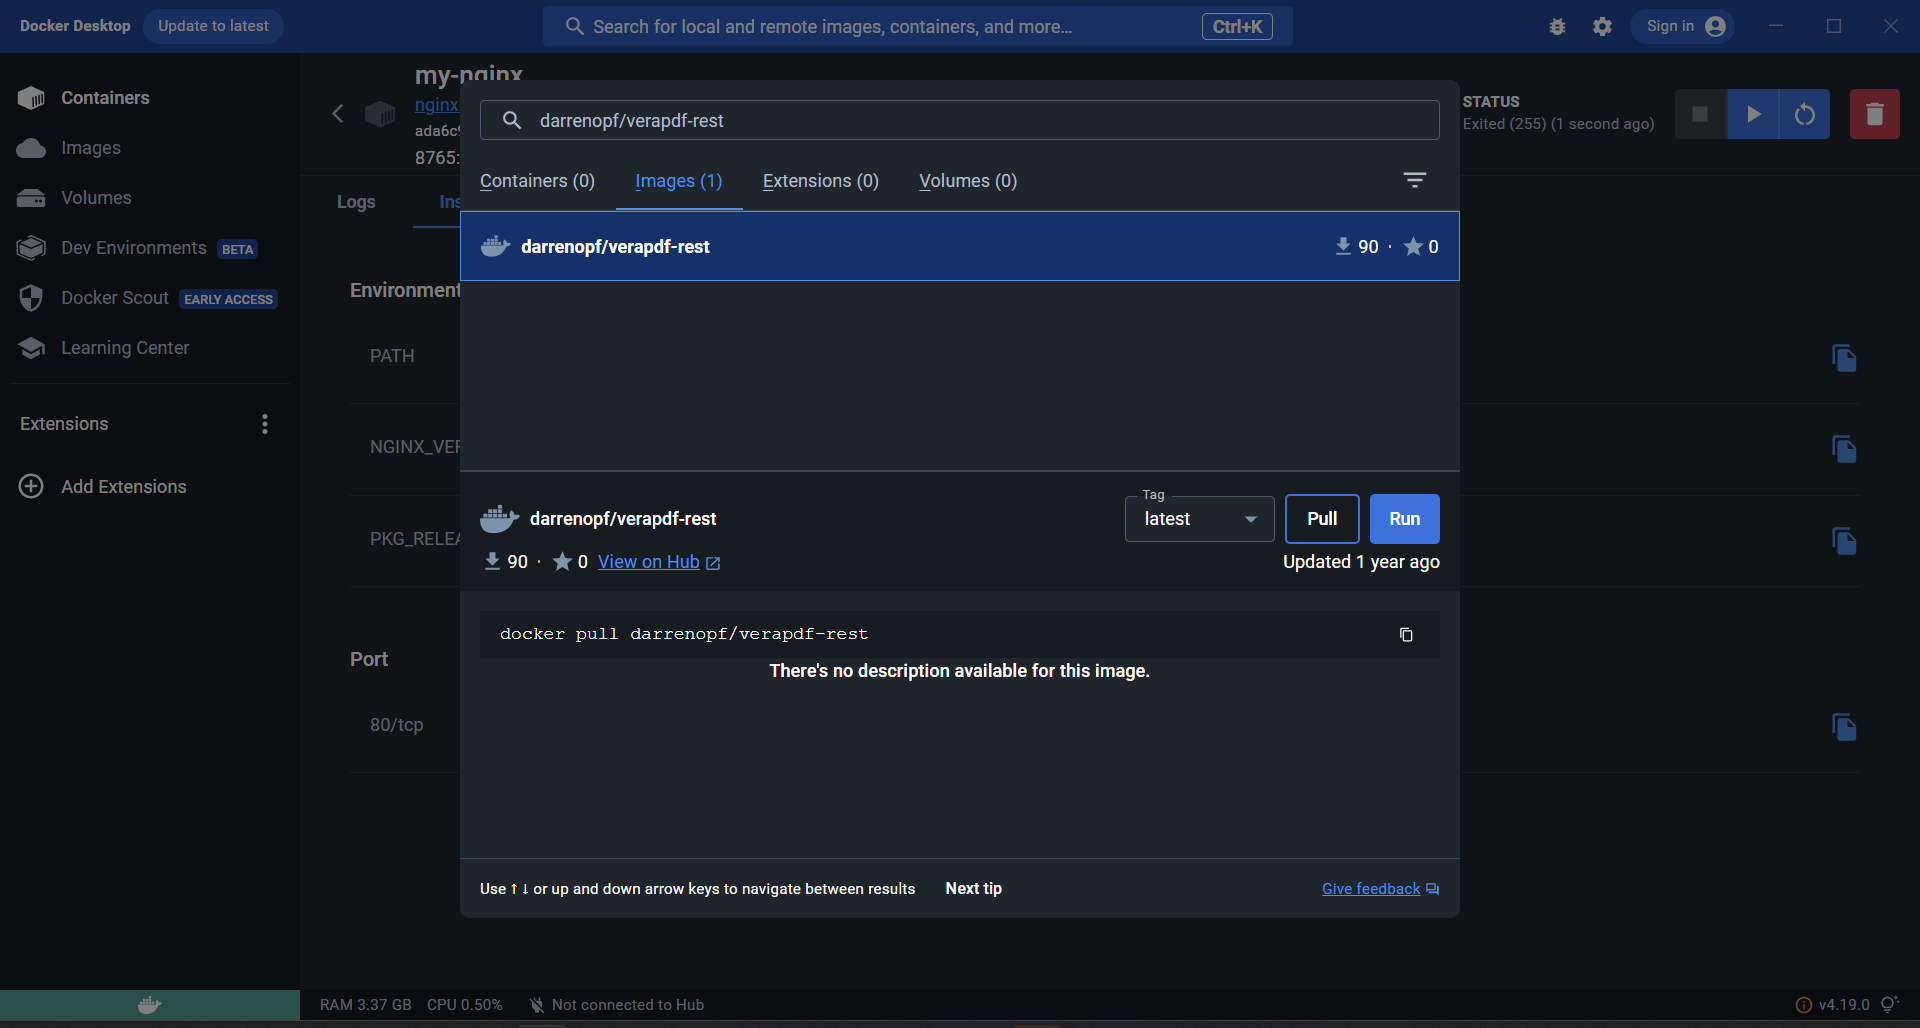
Search for the Image
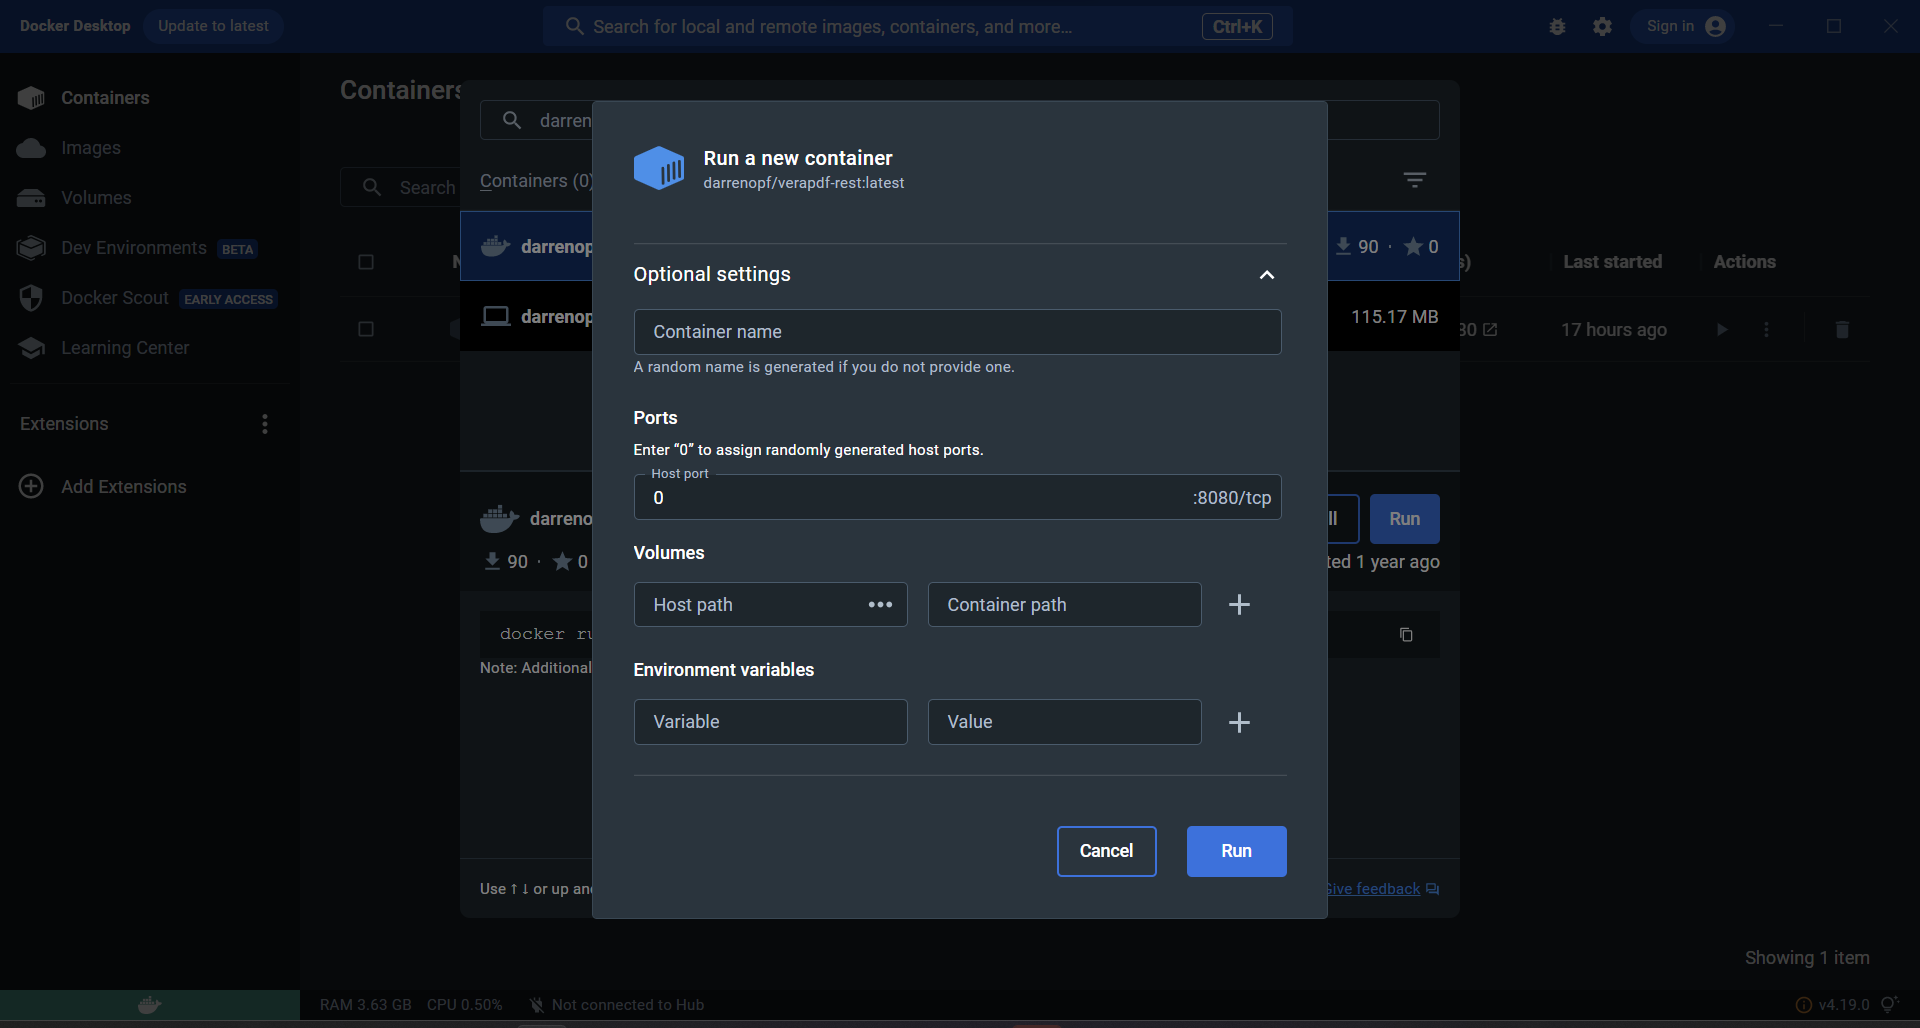
Run the Image
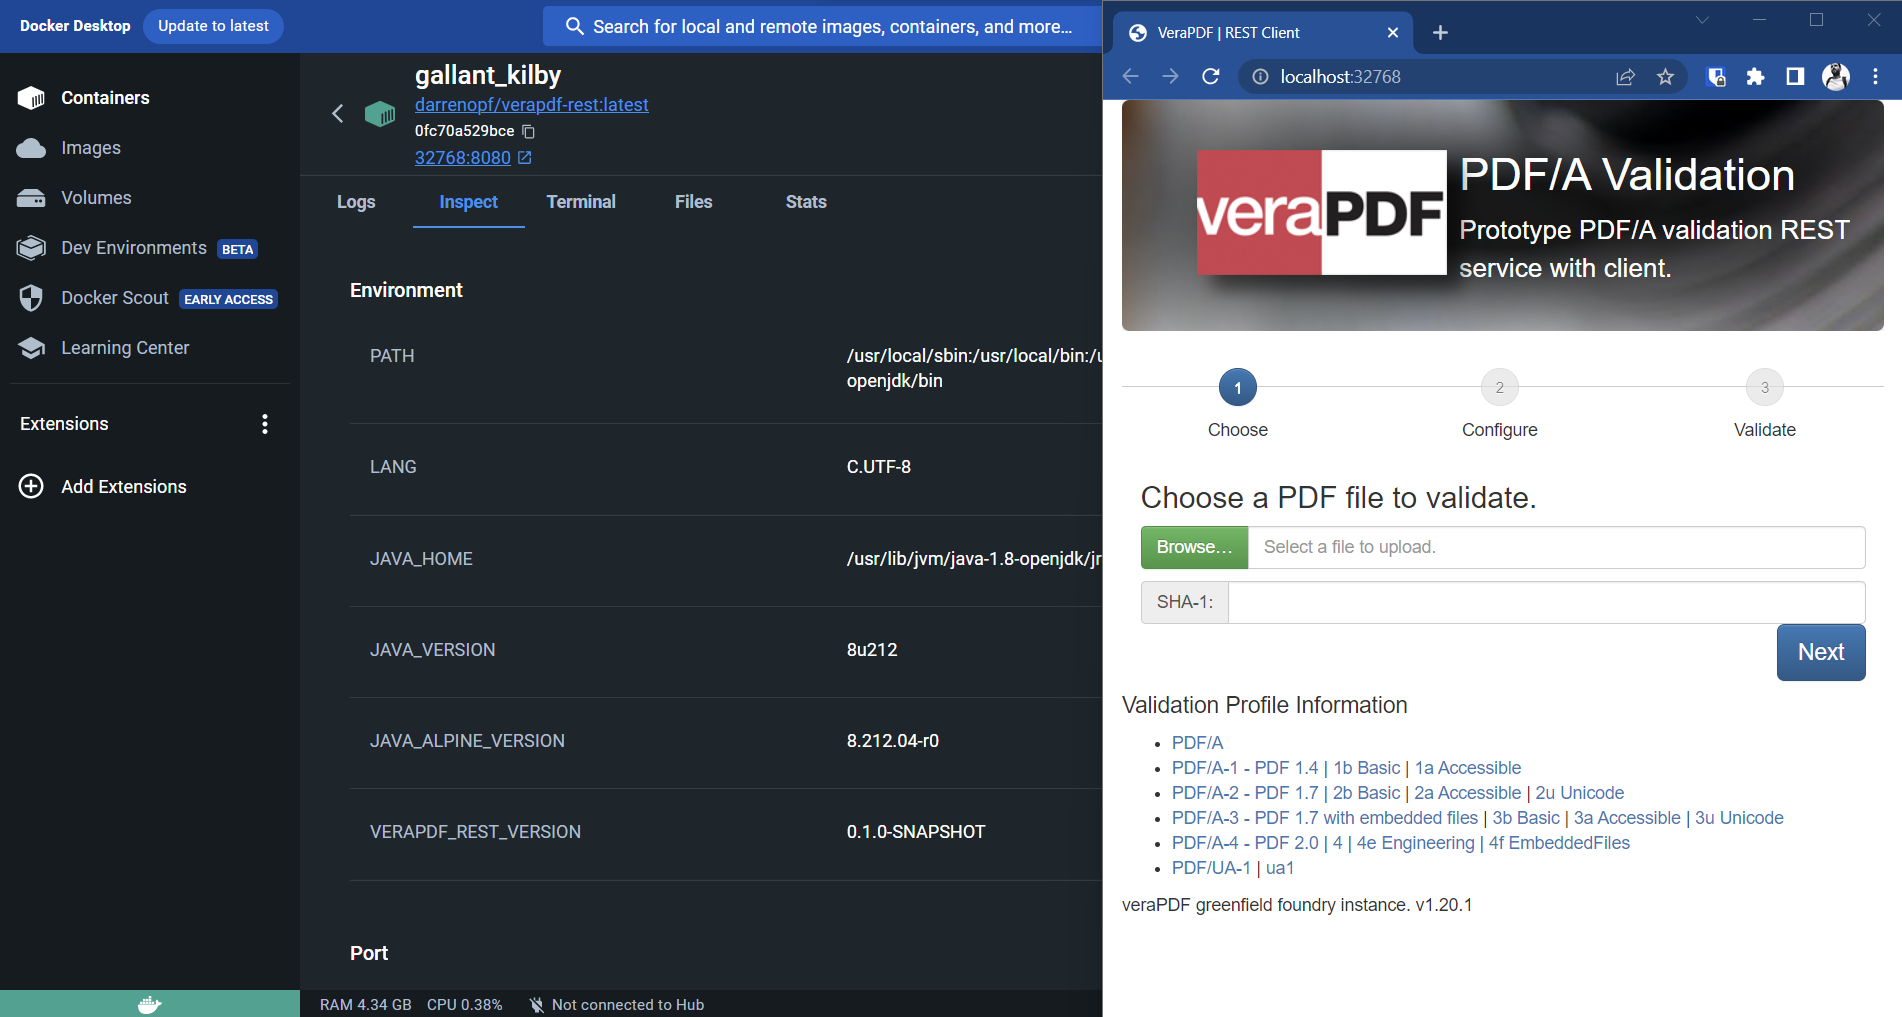
By visiting the locally running web application (or by clicking the ports mapping link under the Container name in Docker Desktop) I can see the Web GUI for veraPDF.This is one of the ways we here at the OPF use Docker. We have automated processes that package up our products into a Docker Image, so that they can be easily distributed and used by others.
Image Layering
Docker images can be extended into new images through a mechanism known as image layering. Docker utilizes a layered filesystem that allows images to be built incrementally by adding new layers on top of existing ones. When extending an image, Docker creates a new layer containing only the modifications or additions made in the new image. This approach leverages the existing layers from the base image, reducing redundancy and optimizing storage usage.
You can do this yourself easily via the command line when you make modifications to an image you pulled locally from Docker Hub. That image is then available locally to you on your PC. Or you can push it back up to the Docker Hub website to share with the world.
Let's create an Image
We will start with the basic nginx web server Image. For those familiar with setting up nginx. You normally put your HTML files into the correct folder, perhaps edit a website.conf settings file and run the server.
With Docker, I could run the image and then get a shell inside the running Container, and edit the files I need. Or with Docker Desktop I could find the files and edit them: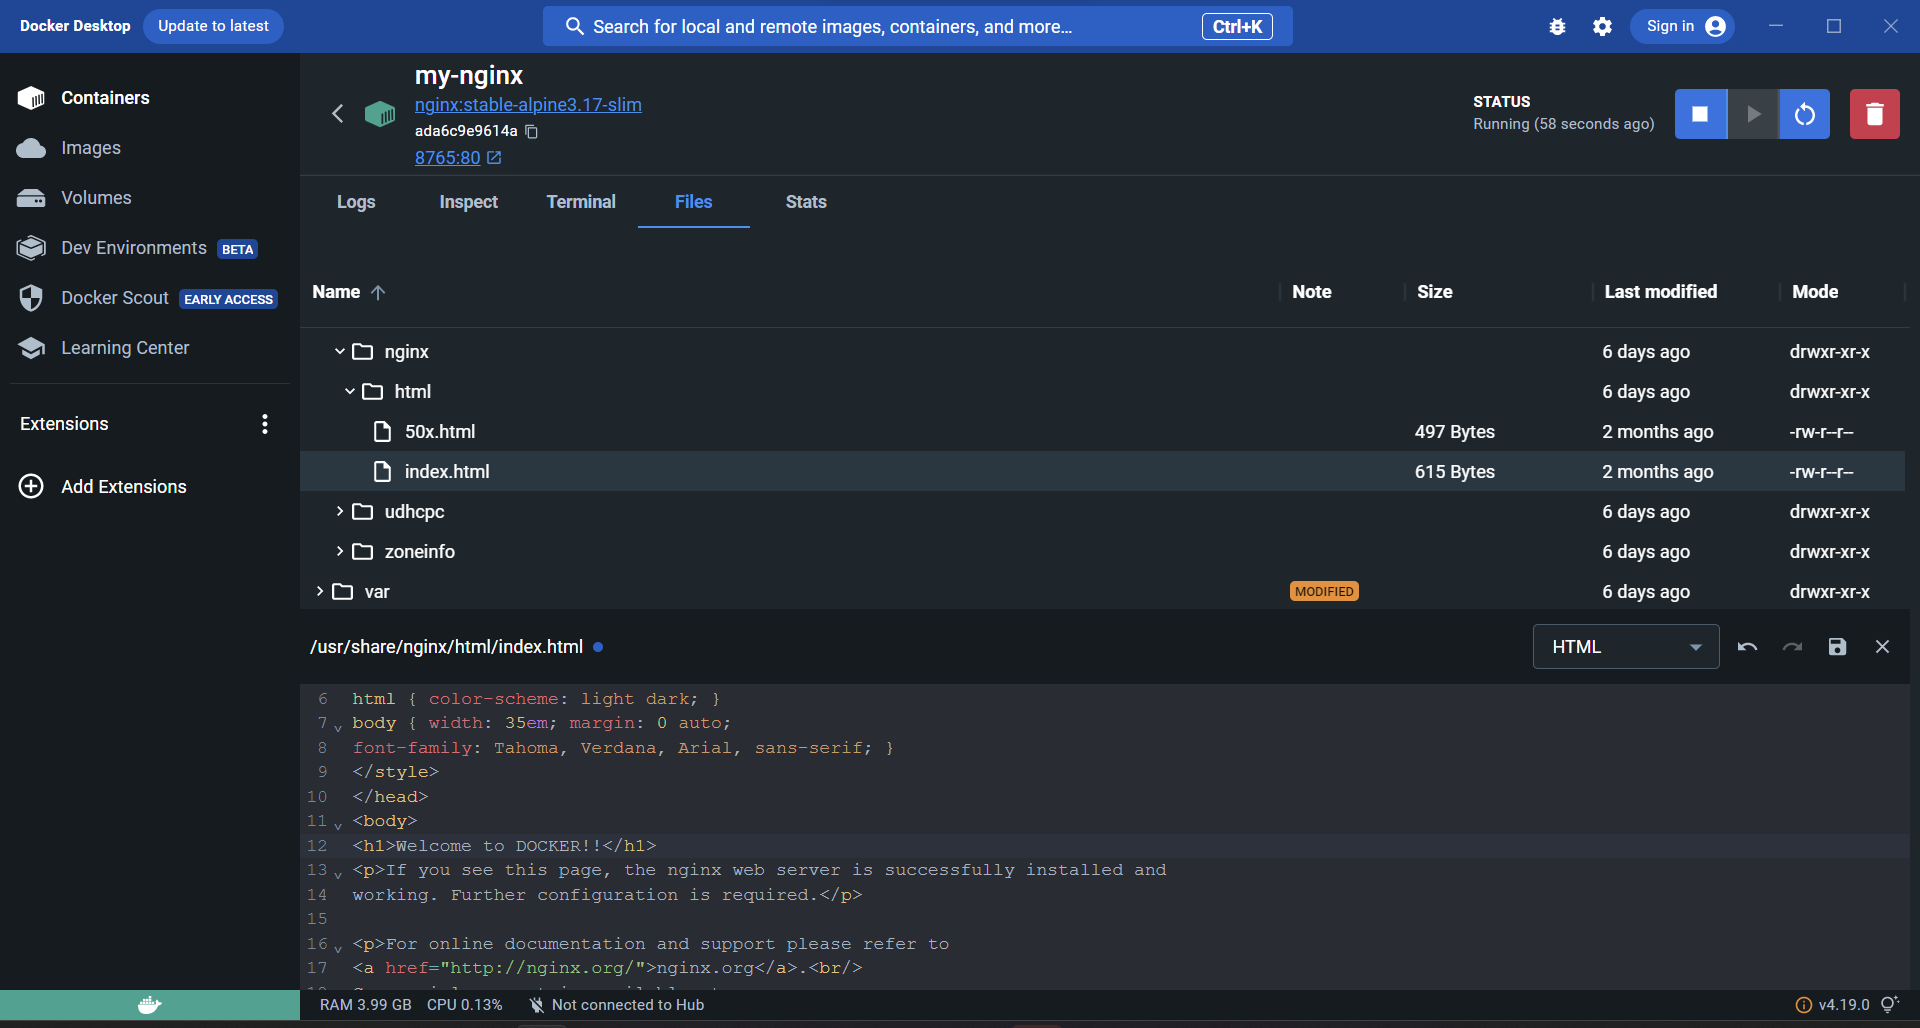
Find and edit the index.html file (changing 'nginx' to 'DOCKER').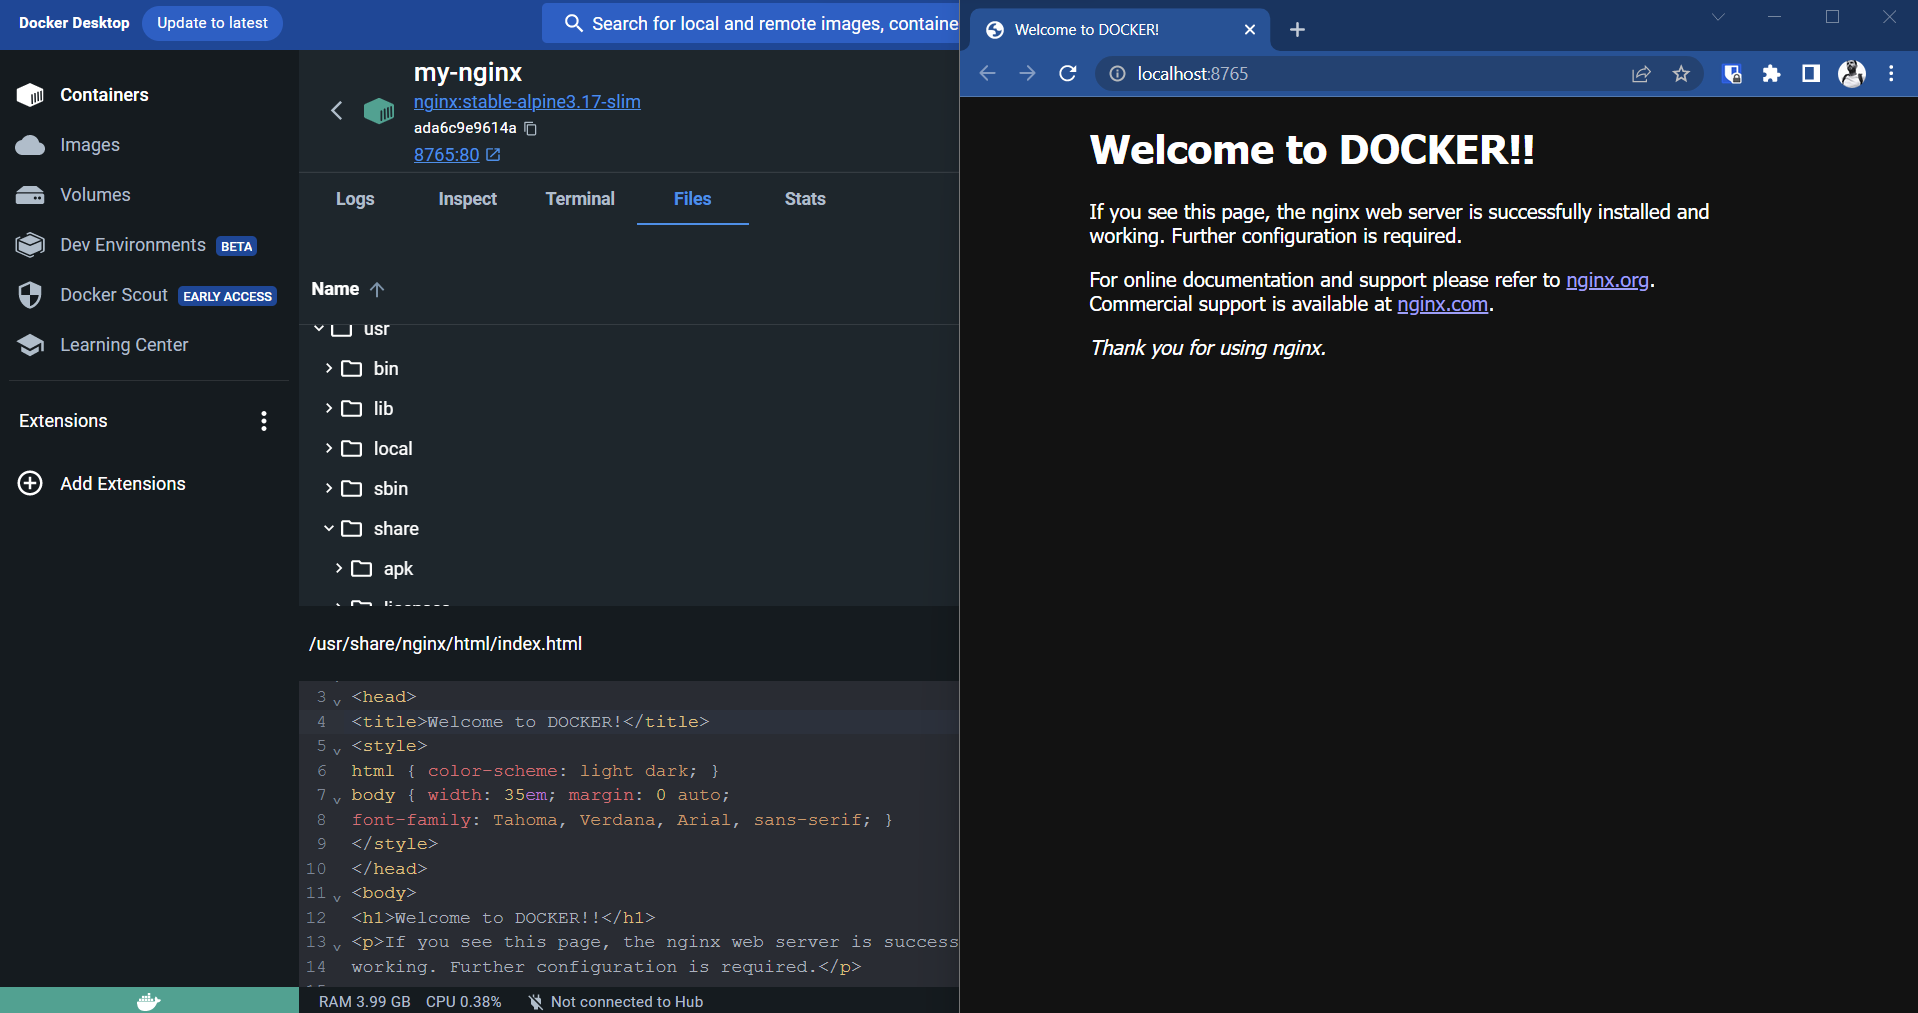
Save the file and witness the changes live, by reloading the web page.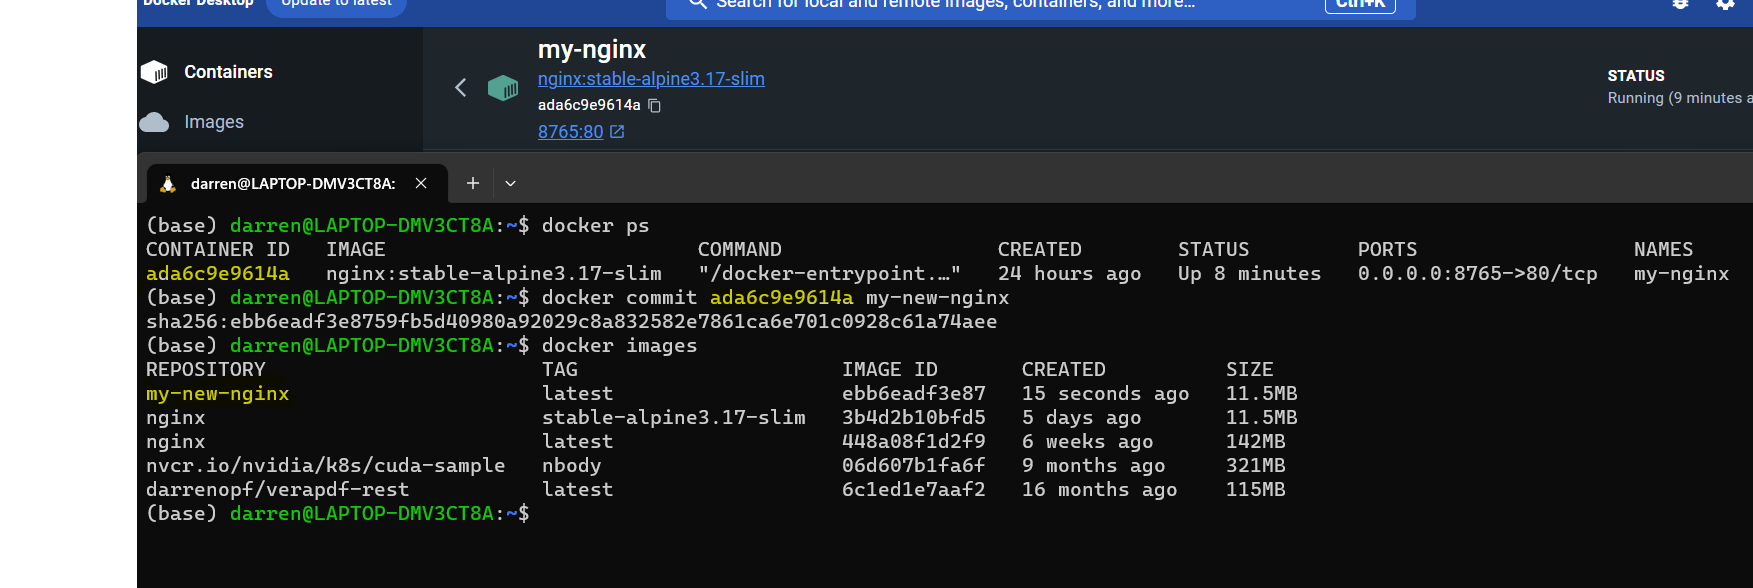
Docker Desktop does not have the commit command, so I jump into the terminal and get the Container ID via thedocker pscommand. I can then use the 'docker commit' command with that ID and a new Image name. To create my own extended nginx image.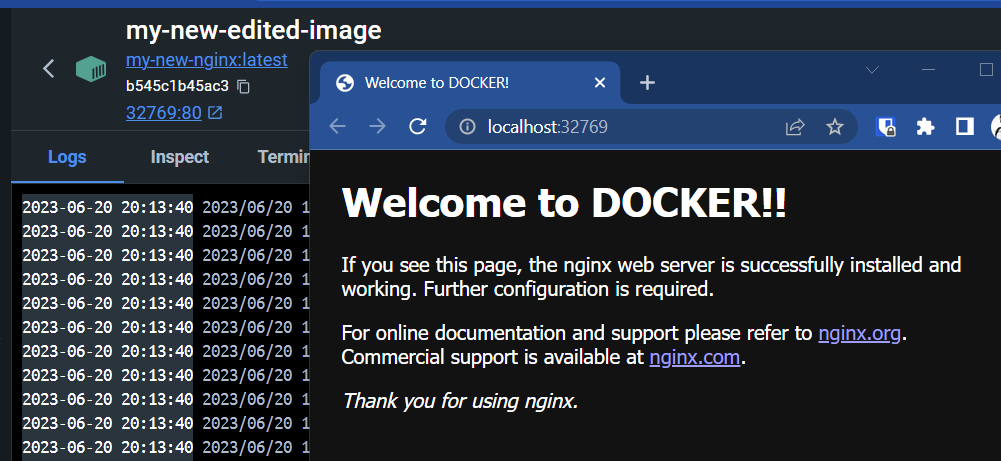
I can now Run that new image in a new Container - and we can see the updated home page is part of the ImageIs this practical?
I don't think this a practical workflow for someone developing a website. It might be a way to deploy a website on a cloud hosting platform however. But even in that use case there would be a better way to generate the Image.
Practical use cases
If we were going to develop a website and use this nginx Image and Docker to help us. Then a much better approach would be to create a folder for our project, put our HTML files inside this project folder and while we are at it - put this project under git management. We can then use Docker Volumes to inject these files into the Container's filesystem. To do that we use the
-v <source>:<destination>flag and pass in the source and destination folders (or individual file) from the Host filesystem to the Container filesystem.Volumes
Volumes, we finally made it to one of the most important core concepts pertaining to docker, and I may have gone a bit of a roundabout way here. But I think their usefulness and power is better demonstrated when you see how cumbersome the alternative is! We will also come full circle later in this series when we come to package our applications into Images by including our code or binaries into the Image.
Example time
I recently created a simple nginx based project for the OPF event in Finland that is good candidate for this example. There is an 'html' folder in the project that we can map into the nginx folder and when the Container runs we will see the demo application running - not the normal nginx welcome screen.
By putting together everything we have learned so far, the terminal command to launch our app inside a running Container would look something like this:
docker run -d -v ./html:/usr/share/nginx/html -p 80:80 --name my-volume-app nginxWe have the -d for background operation (detached in docker speak), next the volume mapping the apps html folder over the container's html folder. the port, the app name and finally the base Image to use from Docker Hub.
If I were to edit the html files and save them, and then reload the web the the app is running in, I would see those changes immediately in the browser! Cool!
And just to check that we are seeing the files we expect, let's look inside the container's filesystem:
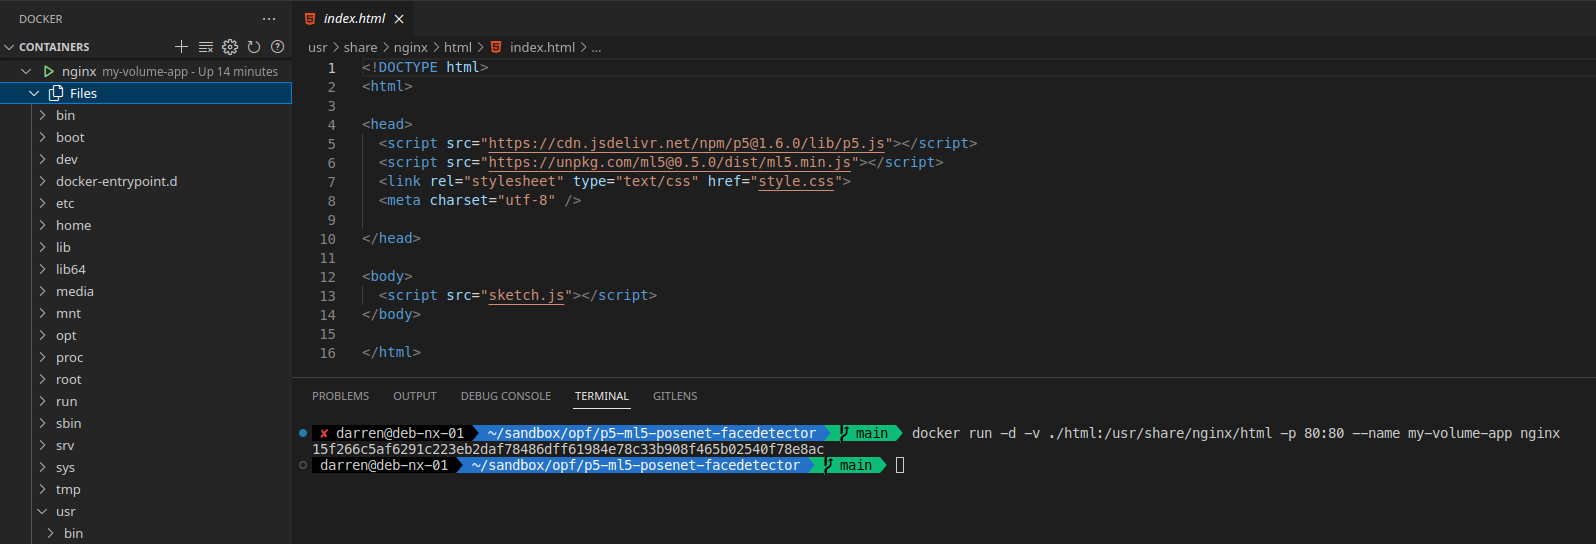
Here I can see that the files inside the container have been replaced by the project files. (The reason this UI suddenly looks different is because this is actually VSCode, an IDE, or Integrated Development Environment. Where I actually spend most of my time when dealing with GitHub and Docker. In this screenshot I have a Docker explorer running in the sidebar and a bash shell in the bottom pane)Conclusion
We covered a lot of ground in a short time span, so I am going to take a break here. We have explored a little mode depth into the inner workings of Docker, and we have seen how to actually test and develop applications with docker and volumes to help us. The commands to mount volumes and to create images are becoming a bit unwieldy, so next time we are going to see some tools and processes that will make our lives easier when it comes to volumes and creating Images. We are also going to look at using containers in groups (putting the stack in full stack development!). So hopefully most of what we did today will become academic theory. Next time look out for stacks, docker-compose and Dockerfiles!
-
RE: Automate the Borning Stuff with Python (2nd Edition) - Practical Programming for Total Beginnersposted in Learning to Code
@Micky This is great, thanks for sharing. I would like to add this online course for python beginners that has some problems to solve and lets you practice writing python in the browser, without all the hassle of opening a terminal!
https://codingbat.com/python -
RE: Docker and Docker Composeposted in Interesting Reads?
@mpall8 Started again.
First part of the topic is now online here:
https://community.openpreservation.org/topic/14/introduction-to-docker -
Introduction to Dockerposted in Packaging Standards & Containerisation
Beginners guide to docker
What is Docker?
At its core, Docker is an open-source platform that enables you to package and run applications within isolated environments called containers. These containers encapsulate an application along with its dependencies, libraries, and even the operating system components, providing a consistent and portable environment. Docker simplifies the process of software deployment by allowing developers to create, manage, and distribute these containers seamlessly across different machines and environments. By leveraging containerization technology, Docker enhances scalability, resource efficiency, and ensures consistent application behaviour, revolutionizing the way applications are built, shipped, and run.
If you're familiar with the command line, you're already one step closer to grasping the power of Docker. Imagine being able to package an application along with all its dependencies into a single, self-contained unit that can run reliably on any machine, regardless of its underlying environment. If you're not that familiar with the command line - then watch out during the hackathon as we will be creating posts like this to help you out!
Installing Docker
So you like the sound of this world of containers and want to get in on the action? Great news, as Docker is available to install on to all major operating systems in a few clicks or keystrokes.
I won't reinvent the wheel on this one, the official documentation will guide you through the process:- Mac: https://docs.docker.com/desktop/install/mac-install/
- Windows: https://docs.docker.com/desktop/install/windows-install/
- Linux: https://docs.docker.com/engine/install/
Containers and Images
- A Container is a sandboxed instance of a filesystem and running applications.
- An Image is lightweight immutable file that contains everything needed to launch a container.
Containers and Images make it easy to create and share consistent and reproducible portable application environments. So you can be confident that an application running on your laptop will run on someone else's, or in the cloud.
There are plenty of docker images out there in the wild. The biggest collection and default repository is Docker Hub. So if you want to host a website, or find an Image for that hot new application stack then begin your search there. https://hub.docker.com/
More and more Images can now be found in the GitHub repositories, because of a feature of GitHub that makes building and packaging Images easier, but we will touch on that later in this series.
Your first Docker Container
It is always hard to to pick a first container to show someone, there is the classic "hello-world" Image, but it always feels a bit 'meh' to me, as you went to some effort to install Docker, and that image is more to show the stack is running. One thing most people have done at one point or another is setup a website. And it is very easy to use Docker to fire up an nginx web-server container. In your terminal run the following command:
docker run -d -p 80:80 --name my-nginx nginx- 'docker run': This is the command that tells Docker to run a container based on an image.
- '-d': This flag stands for "detached mode." It runs the container in the background, allowing you to continue using the terminal while the container is running. (Some containers can be run like command line applications and run once and output a response)
- '-p 80:80': This flag maps the port of the host machine to the port inside the container. In this case, it maps port 80 of the host machine to port 80 of the container. Port 80 is commonly used for HTTP web traffic.
- '--name my-nginx': This flag assigns a name to the container. In this example, the name "my-nginx" is given to the container.
- 'nginx': This is the name of the Docker image to use for creating the container. In this case, it refers to the official Nginx image available on Docker Hub.
If this command runs successfully and everything went okay you should be able to go and see the "Welcome to nginx" splash screen by going to http://localhost:80/ in your browser.
You can stop the nginx container by running the following command in your terminal:
docker stop my-nginxThis is the docker command that will stop a container based on its name.
Docker Desktop nginx example
It is possible to use the Docker Desktop tool to do what we just did too.
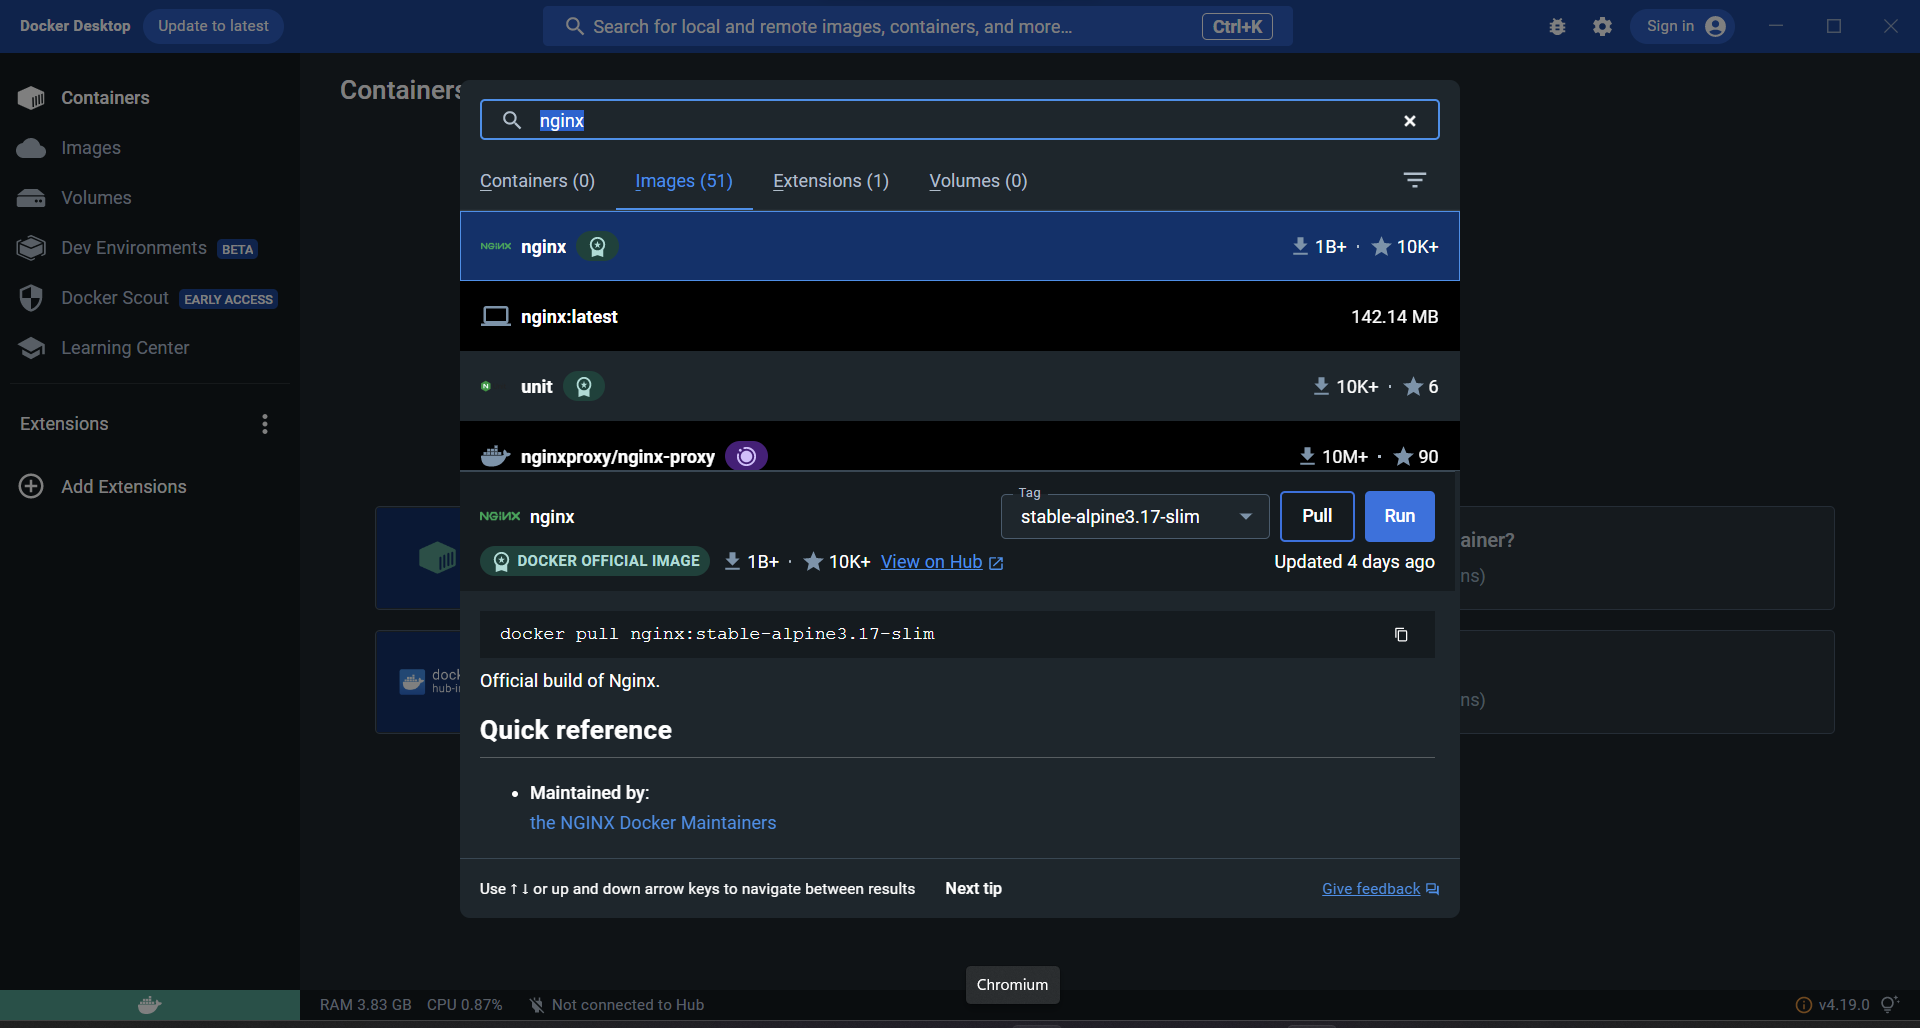
Open the GUI application, and search for the nginx image in the search bar at the top of the window. There are likely to be a lot of results (its very easy to remix and create images as we will learn later). The first result should be the official image created by the nginx team.
When you're ready click 'Run'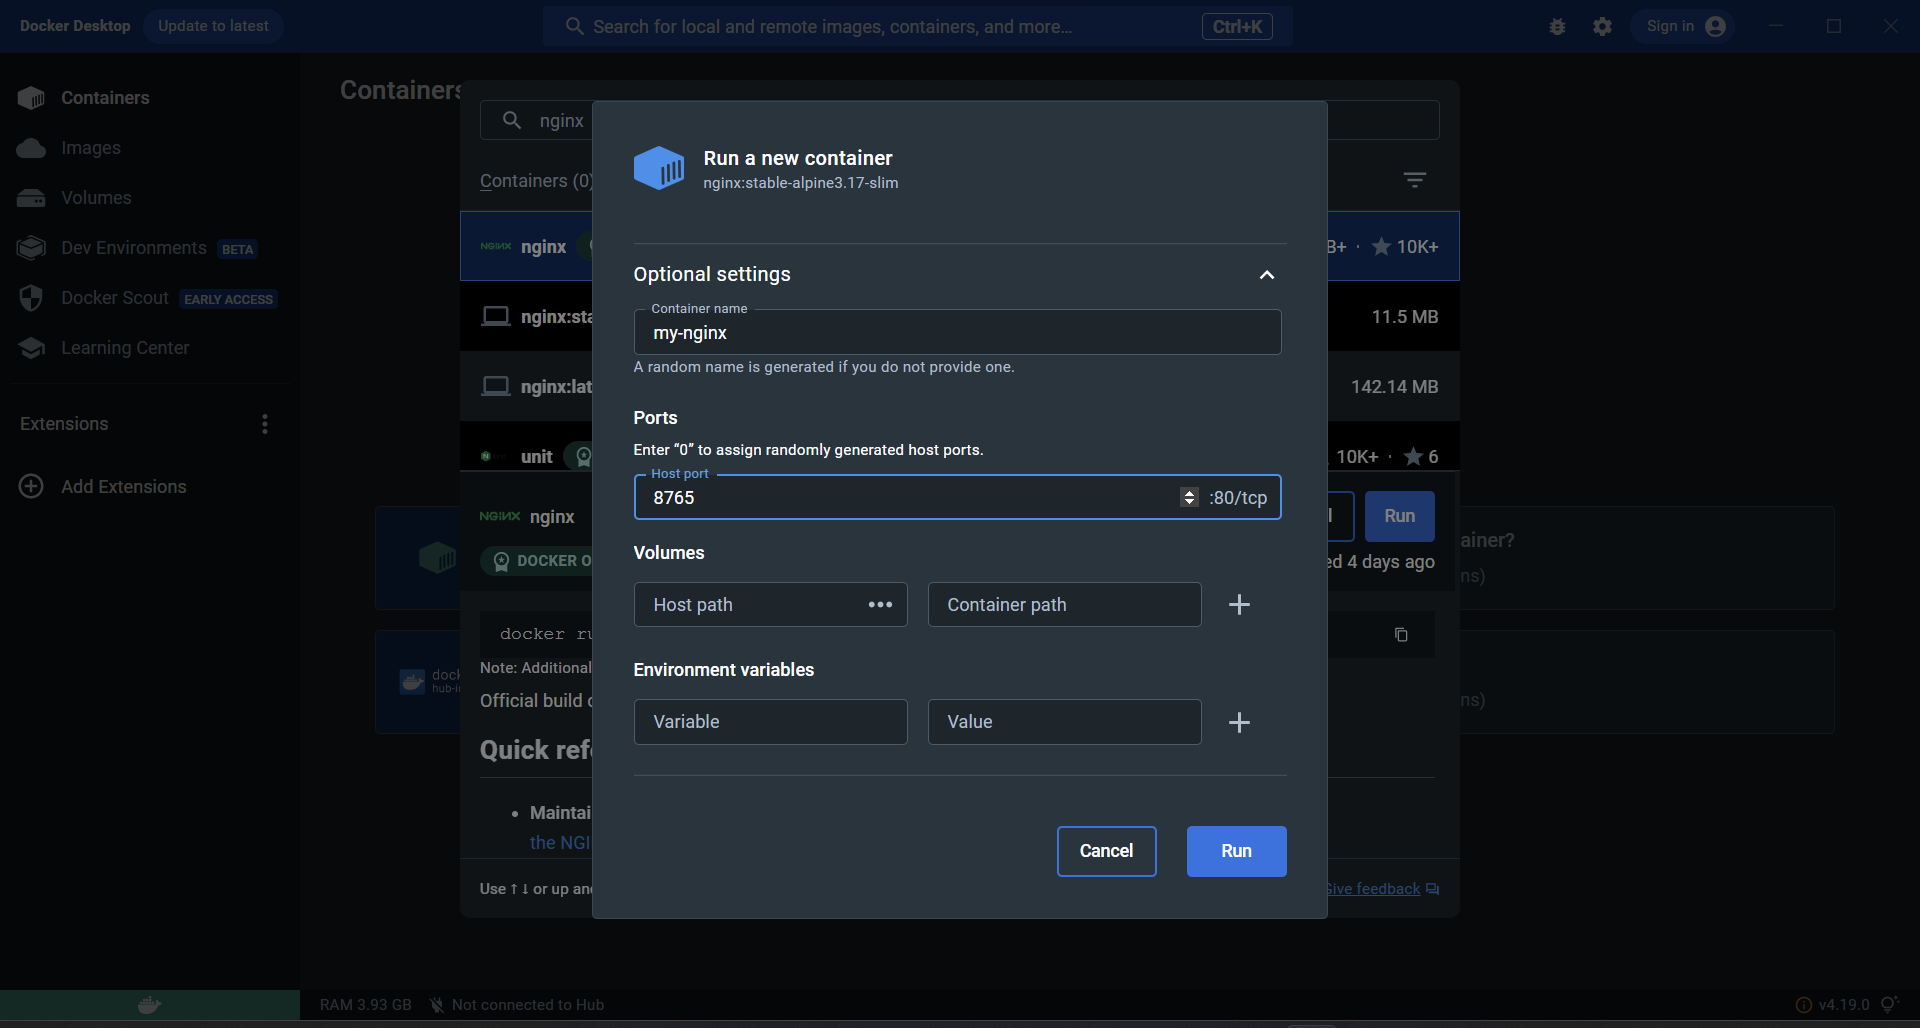
On the next screen you can choose the settings - just like with the parameters we used on the command line. Here I have chosen a different host port. Plus we can see some mention of settings we have not used yet, like Volumes, that we will explore next time.
Give the container a name and click 'Run' again.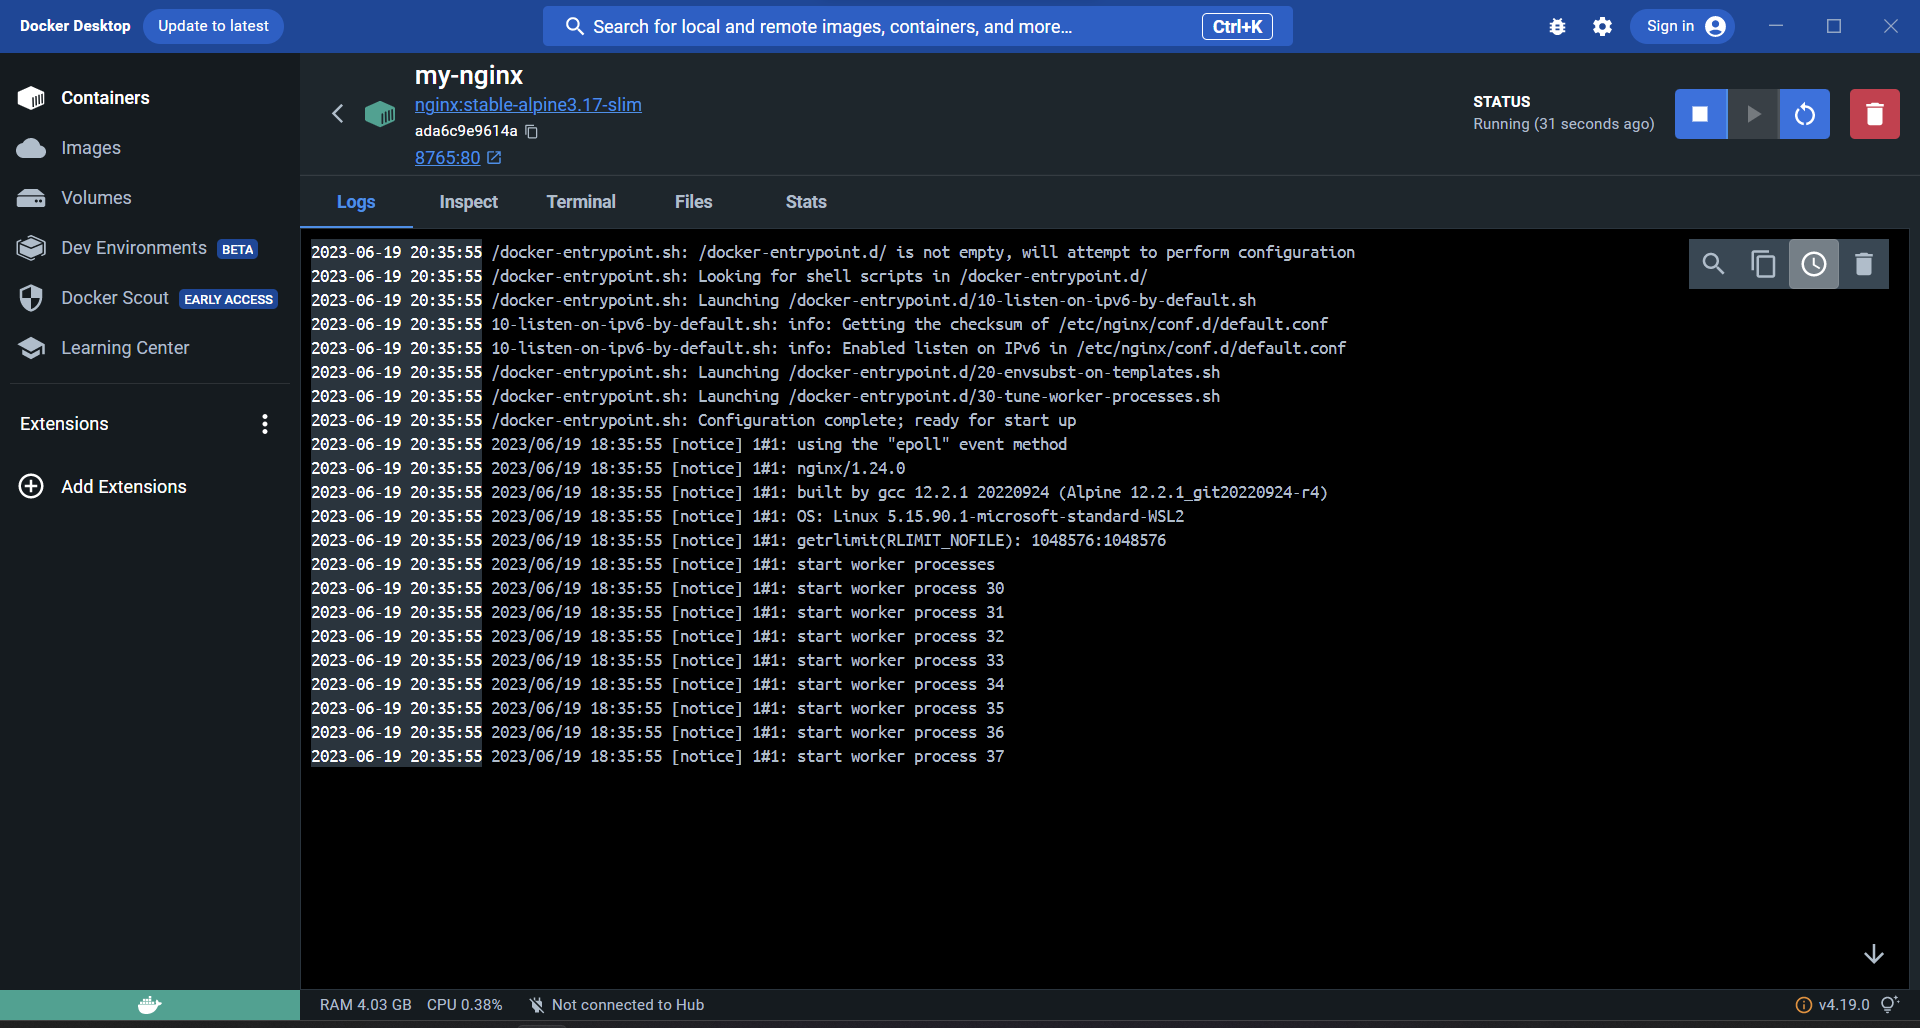
Now the Image will be downloaded, and a Container will spin up, you will be shown the logs of nginx initialising. From this view, you can continue to explore the running container with the tabs. All the information you can find here is also available on the command line. And any containers you generate on the command line can also be investigated here.
The Inspect tab lets you see the container settings. Files lets you look at the filesystem of the container. Terminal lets you get a shell inside the running container.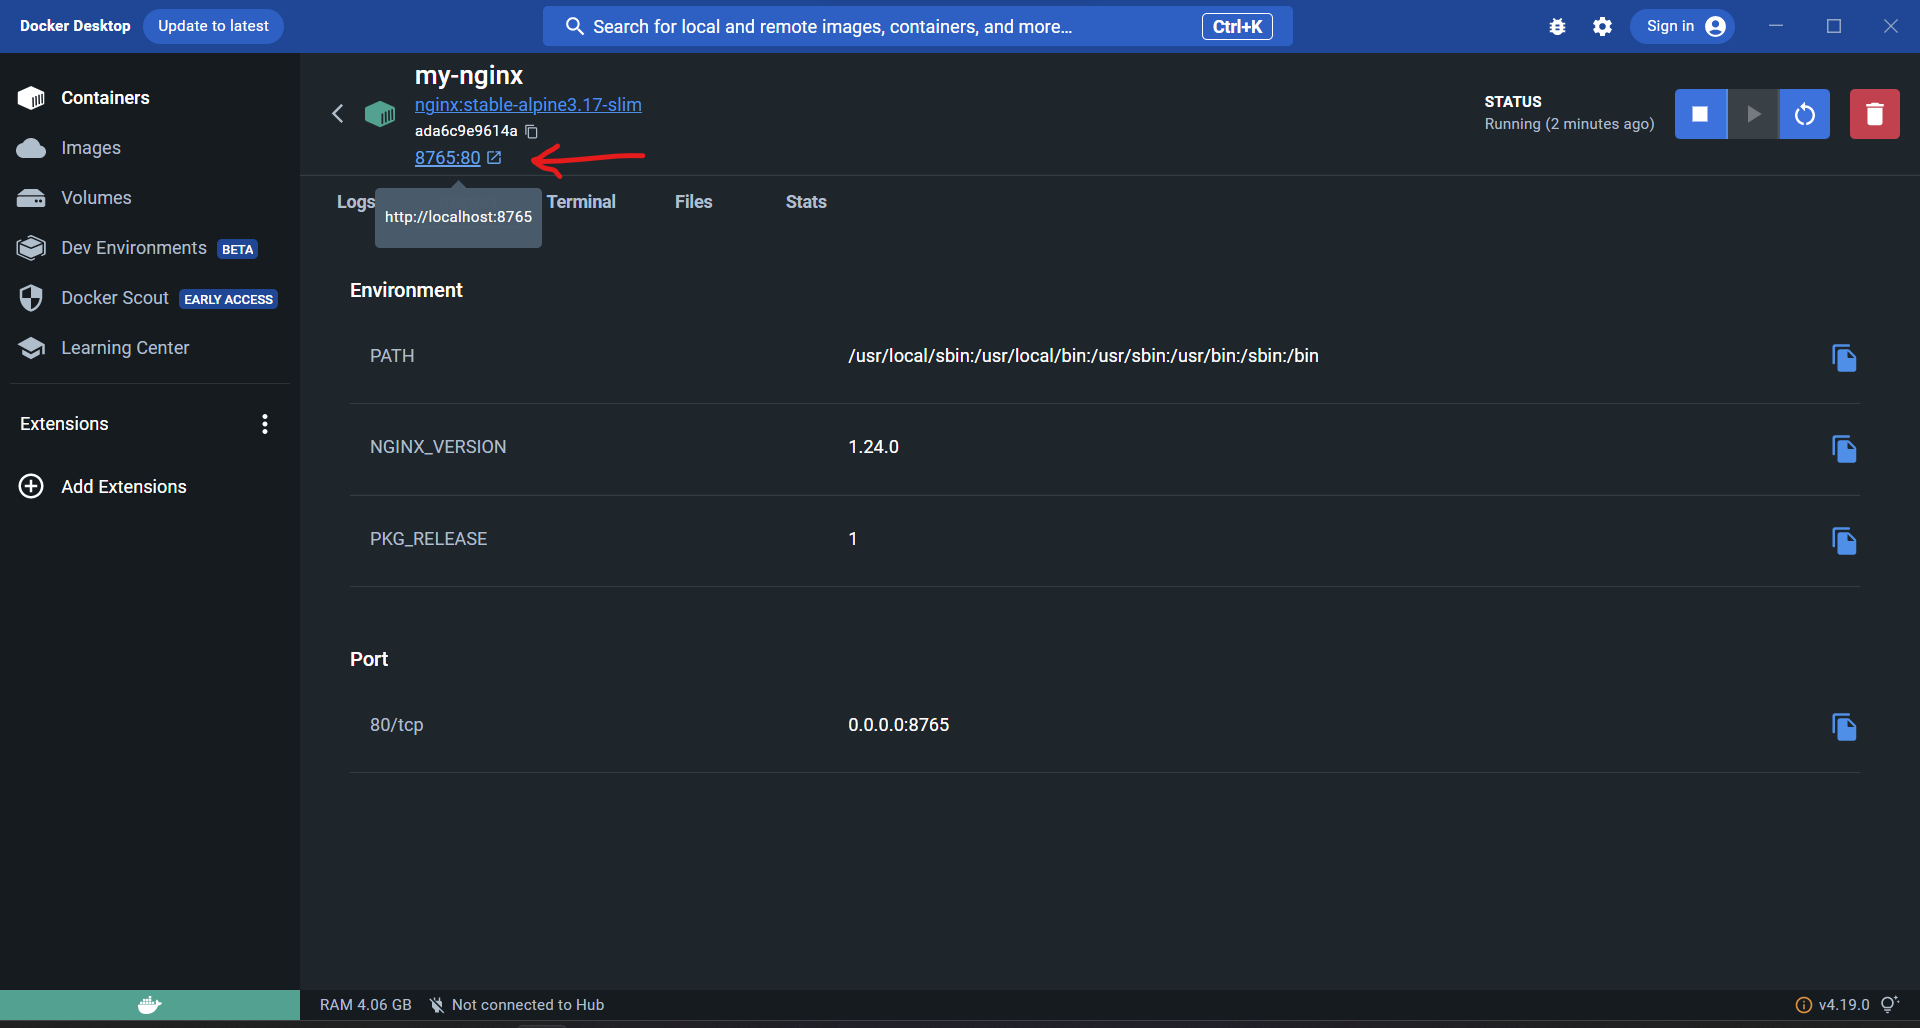
In the top part of the display we can see the externally mapped port to this web application that I choose during the setup. You can click this to quickly jump into the running application! Give it a try.
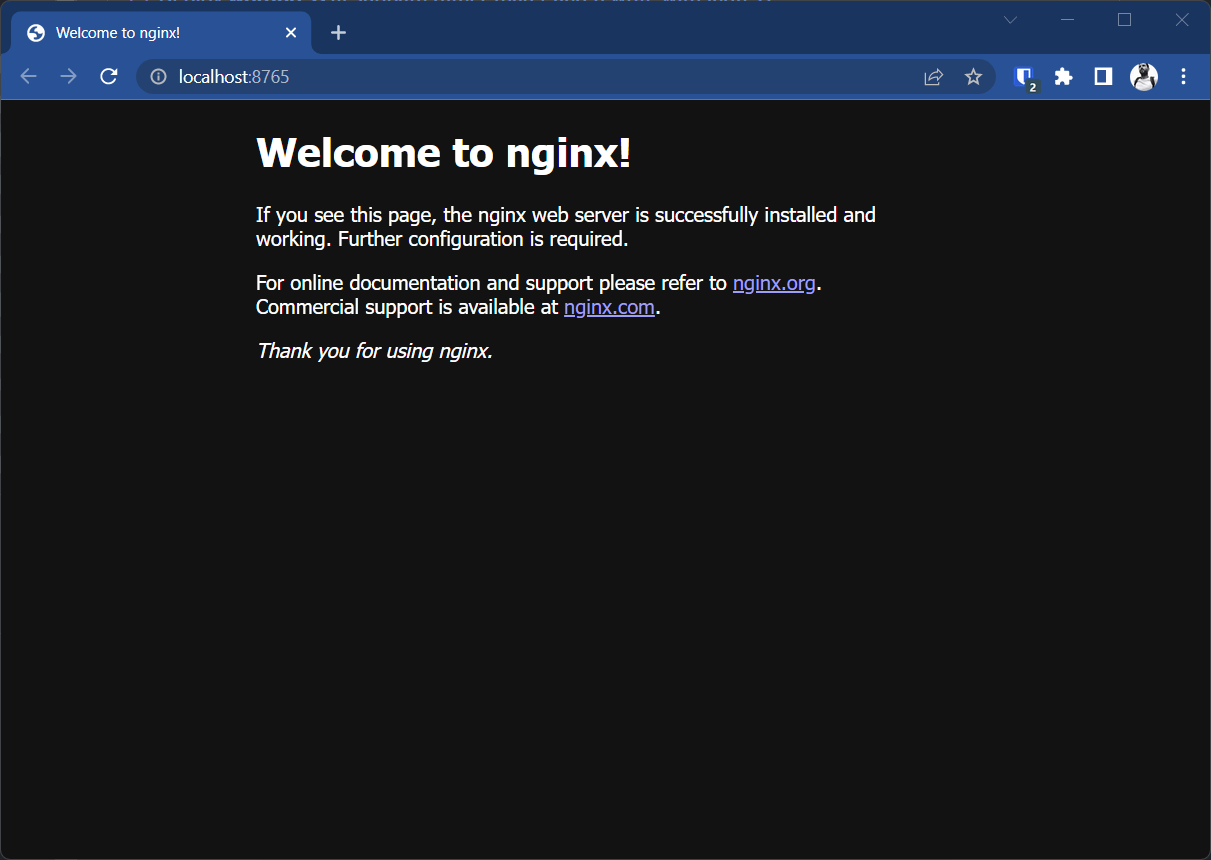
It's not much now, but its a great start to our Docker journey. We have our first web application running in just a few clicks.
Next steps
This was a very brief introduction to Docker to let you dip your toes in and have a splash. Hopefully it showed how easy it is to spin up a container. The next steps from here would be to put your own HTML files into the web application, and then spin up a SQL server for data persistence. And these steps are just as easy as getting nginx running. But I will cover those topics in the next instalment of this series on Docker. I will edit this post with a link to that when I write it.
-
Docker and Docker Composeposted in Interesting Reads?
Docker Tricks and Tips
- How to organise your projects.
- How to get free SSL certificates.
- How to implement secrets.
Series starts here:
https://community.openpreservation.org/topic/14/introduction-to-docker